งานปฏิบัติที่ 10
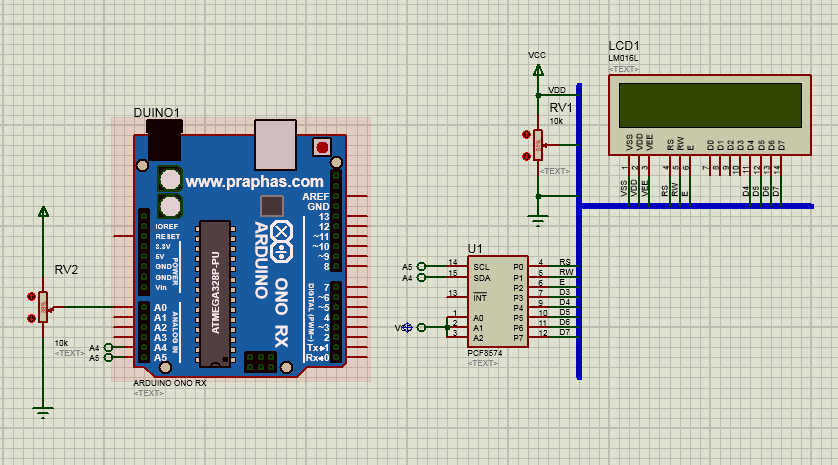
wiring diagram
รูปที่ 1

Code 1🔻
Code 2🔻
Code 3🔻


รูปที่ 1

Code 1🔻
#include <Wire.h>
#include <LiquidCrystal_I2C.h>
LiquidCrystal_I2C lcd(0x27,16,2);
void setup()
{
lcd.backlight();
lcd.begin();//LiquidCrystal_I2C
}
void loop()
{
lcd.setCursor(0,0);
lcd.print("Hello LCD I2C");
lcd.setCursor(0,1);
lcd.print("Pattayatech");
}
Code 2🔻
#include <LiquidCrystal_I2C.h>
LiquidCrystal_I2C lcd(0x27,16,2);
int x=48;
int y=-79;
float z=8.74586;
void setup()
{
lcd.begin();
}
void loop()
{
lcd.setCursor(0,0);
lcd.print("x = ");
lcd.print(x);
lcd.setCursor(8,0);
lcd.print("y = ");
lcd.print(y);
lcd.setCursor(0,1);
lcd.print("z = ");
lcd.print(z,4);
}
Code 3🔻
#include <LiquidCrystal_I2C.h>
LiquidCrystal_I2C lcd(0x27,16,2);
byte heart[8] = {0x00,0x0A,0x1F,0x1F,0x0E,0x04,0x00,0x00};
byte smile[8] = {0x00,0x11,0x00,0x00,0x11,0x0E,0x00,0x00};
void setup()
{
lcd.begin();
lcd.createChar(0,heart);
lcd.createChar(1,smile);
}
void loop()
{
lcd.setCursor(0,0);
lcd.write(0);
lcd.setCursor(0,1);
lcd.write(1);
}
Code 4🔻
#include <LiquidCrystal_I2C.h>
LiquidCrystal_I2C lcd(0x27,16,2);
void setup()
{
lcd.begin();
}
void loop()
{
lcd.home();
lcd.print("ECS");
for (int i=0;i<13;i++)
{
delay(400);
lcd.scrollDisplayRight();
}
for (int i=0;i<13;i++)
{
delay(400);
lcd.scrollDisplayLeft();
}
}
รูปที่ 2
Code 5🔻
#include <LiquidCrystal_I2C.h>
LiquidCrystal_I2C lcd(0x27,16,2);
int aVal=0,tempaVal=0;
void setup()
{
lcd.begin();
}
void loop()
{
aVal = analogRead(A0);
lcd.setCursor(0,0);
if (tempaVal != aVal)
{
lcd.clear();
lcd.print(aVal);
delay(300);
}
tempaVal = aVal;
}
Code 6🔻
#include <LiquidCrystal_I2C.h>
LiquidCrystal_I2C lcd(0x27,16,2);
int aVal=0,tempx=0,x;
void setup()
{
lcd.begin();
}
void loop()
{
aVal = analogRead(A0);
lcd.setCursor(0,0);
x = map(aVal,0,1023,1,17);
if (tempx != x)
{
lcd.clear();
for(int i=0;i<x;i++)
{
lcd.print("*");
}
}
tempx = x;
}
รูปที่ 3

Code 7🔻
#include <Keypad.h>
#include <LiquidCrystal_I2C.h>
LiquidCrystal_I2C lcd(0x27,16,2);
char keys[4][4] = {
{'7','8','9','A'},
{'4','5','6','B'},
{'1','2','3','C'},
{'*','0','#','D'}};
byte rowPins[4] = {7,6,5,4};
byte colPins[4] = {3,2,1,0};
Keypad keypad = Keypad(makeKeymap(keys),rowPins,colPins,4,4);
void setup()
{
lcd.begin();
lcd.setCursor(0,0);
}
void loop()
{
char key = keypad.getKey();
if (key != NO_KEY)
{
lcd.print(key);
}
}
Code 8🔻
#include <Keypad.h>
#include <LiquidCrystal_I2C.h>
LiquidCrystal_I2C lcd(0x27,16,2);
char keys[4][4] = {
{'1','2','3','A'},
{'4','5','6','B'},
{'7','8','9','C'},
{'*','0','#','D'}};
byte rowPins[4] = {7,6,5,4};
byte colPins[4] = {3,2,1,0};
char num[4];
int m=3;
Keypad keypad = Keypad(makeKeymap(keys),rowPins,colPins,4,4);
void setup()
{
lcd.begin();
lcd.setCursor(0,0);
lcd.print("PW : ");
lcd.setCursor(5,0);
lcd.cursor();
}
void loop()
{
char key = keypad.getKey();
if ((key != NO_KEY) && (key>=48) && (key<=57))
{
lcd.print(key);
num[m]=key;
m--;
if(m<0)
{
delay(500);
lcd.setCursor(0,1);
if((num[3]=='4')&&(num[2]=='5')&&(num[1]=='9')&&(num[0]=='6'))
{
lcd.print("OPEN");
}
else
{
lcd.print("CLOSE");
}
delay(1500);
m=3;
lcd.clear();
lcd.setCursor(0,0);
lcd.print("PW : ");
lcd.setCursor(5,0);
}
}
}

ความคิดเห็น
แสดงความคิดเห็น